
Reference 1: https://thosbryant.wordpress.com/2022/07/18/early-girling-brake-booster-rebuild-1964-volvo-p1800/
I recently rebuilt a Girling brake booster from a 1968** Volvo P1800 with the help of the owner, a fellow Maineiac. This post is about how to fix the booster, but even more, it’s about how to repair the check valve.
** Although the P1800 is registered as a 1968***, it does have single-circuit brakes, which means that it is actually a 1967 or earlier model year. In fact, it is an “M” model, which were made during 1966-67 and bear chassis numbers from 21000 to 25499 (or possibly 21001 to 25500). Its chassis number is in the second half of that range. This source: https://volvo1800pictures.com/type_codes.php indicates that my customer’s car (Type 183451 M) is in actuality a 1967 model year.
***Also, according to Bjorn-Eric Lindh’s book “Volvo The Cars – From the 20s to the 80s”, dual-circuit brakes first appeared on the “S” model, in the Autumn of 1968. Combine that with the information in the type-code link above and it appears that dual-circuit brakes were introduced for the 1969 model year, not 1968 as has been claimed.
The booster looks like this:
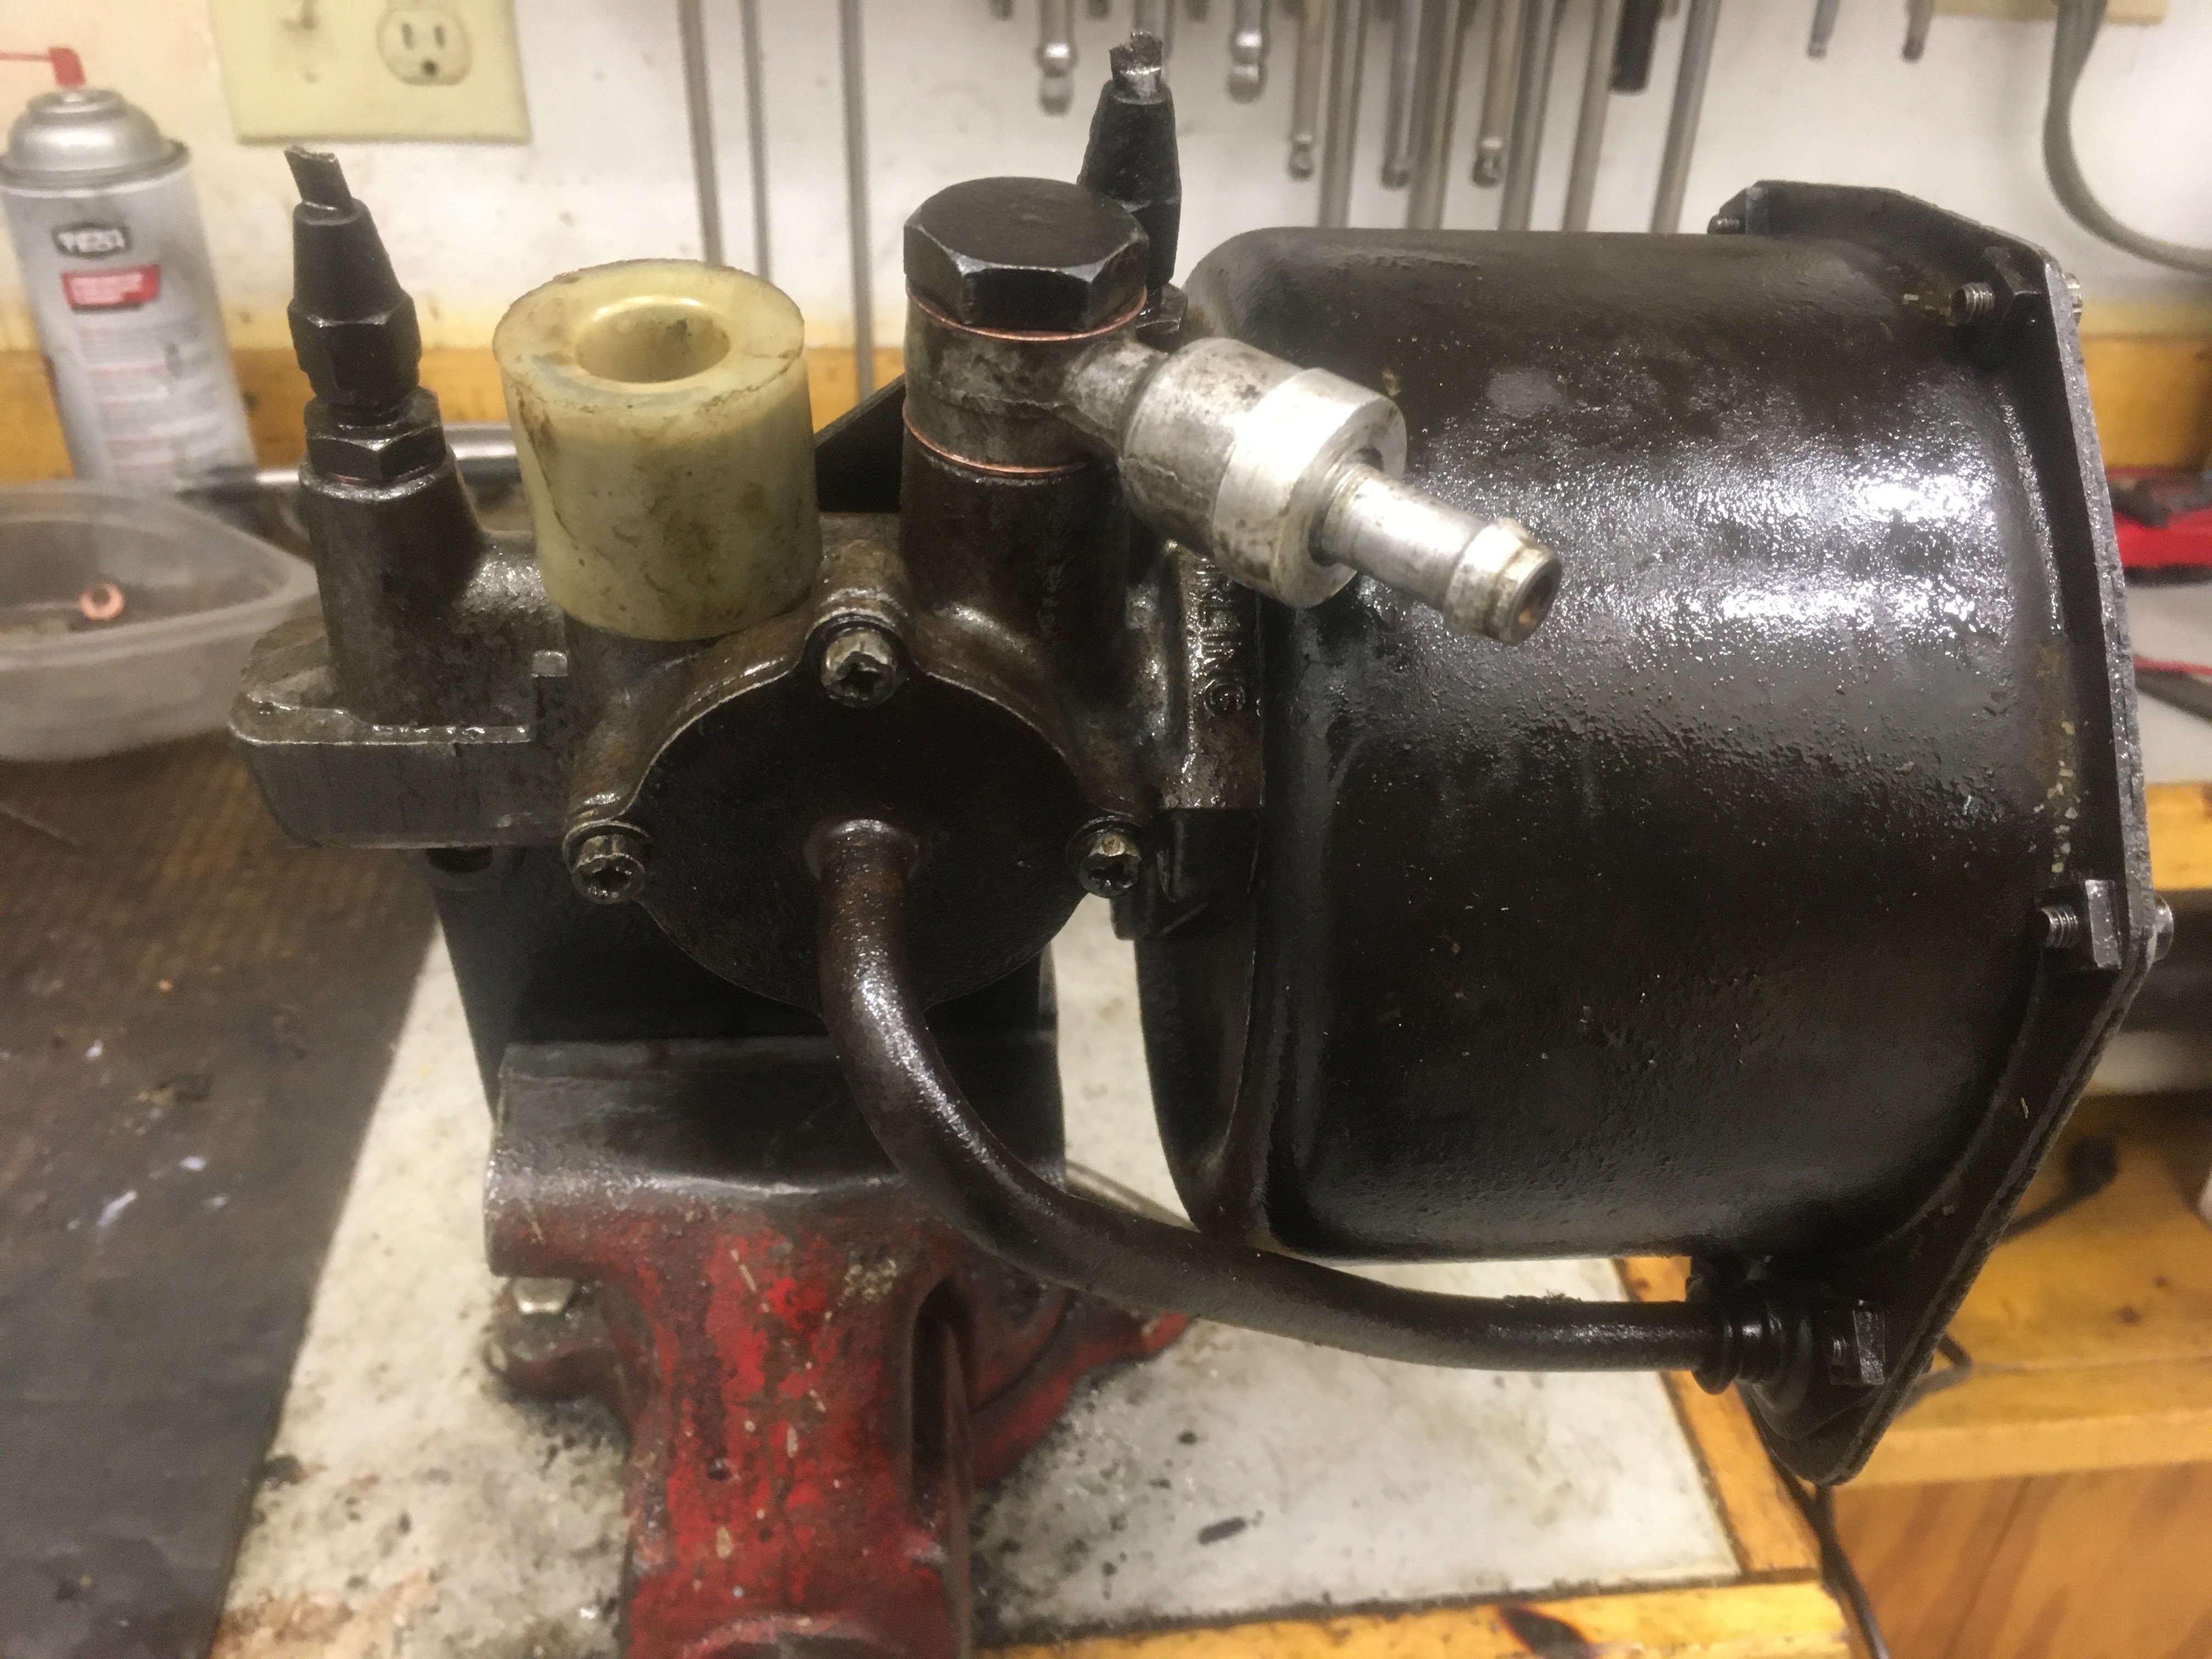 The booster in the above photo is actually from my 1965 Volvo 122S wagon. It had been in storage since 1987, when that car went to Valhalla. While rebuilding my customer’s booster, I decided to pull this one out of storage, tear it apart, clean it up, and try to better preserve it in case someone might need it in the future. So, that explains why it is covered with a film of light oil.
The internal parts of the above booster were full of crud and were thoroughly stuck in place. I was completely unable to disassemble this booster until after it had spent about two days in my ultrasonic cleaner, which did a pretty decent job of loosening the crud so that the parts could be removed. So, remember, if you can’t get yours apart, try an ultrasonic cleaner.
At the time we were rebuilding the booster, I had no intention of documenting the rebuild in this blog, so I didn’t take any photos during the process. After finishing the job, we noticed that the check valve had failed. In fact, we had three of these brake boosters, the one we rebuilt, another one that he gave to me for parts, and my own… the one in the above photo. And, all three of the check valves had failed.
The check valve is inside the aluminum banjo fitting coming off the top of the booster at about a 45 degree angle. And the one shown above has been repaired. I decided to document the check valve repair procedure, which is the primary purpose of this post. We’ll get to that later, but first we’ll take a short look at rebuilding the booster.
The owner purchased a rebuild kit from Mike Dudek, a well-known P1800 aficionado. Kits may also be sourced from numerous on-line vendors. My favorite among them is Harmon Classic Brakes: https://harmonclassicbrakes.com/ They sell several different kits, some much more complete than others.
Rebuild instructions, as shown in the next two photos, came with the kit:

 The instructions are pretty good, but I have a few comments:
- The special tool shown in Steps 9 and 14 is a nice to have, but not necessary; later, I’ll show you how to make do without.
- For several years, back in the 70s and 80s, the rubber strip (41) shown in Step 22 was being made from the wrong type of material, a closed-cell foam that expanded under vacuum and invariably locked the booster, and the brakes. The proper material was originally an open-cell foam. There’s a long story about that little item, which I won’t bore you with here. But… if your brakes lock up, there’s a good chance that you have one of those incorrect foam rubber strips. This particular kit came with the proper type of foam rubber, so I assume that the kits are now all being made with the correct material.
- When removing the “T” lever (18) in Step 4, please don’t make the mistake of removing the air valves and springs from the “T” lever.
- The kit came with a small packet of “red rubber grease”. The instructions don’t say where to use it, and I couldn’t see anything that would benefit from it; I threw it away.
- Step 22 says to coat the seal with “a suitable servo grease (Not Supplied).” Clearly the “red rubber grease” is not suitable for that purpose, nor is the quantity supplied sufficient. I used the silicone/PTFE grease shown in the next photo (Volvo Part Number 1161688):
 Also shown in the above photo are the air filter kit and the air valve kit that I purchased from Harmon Classic Brakes. You probably won’t need the air filter kit, but if you do, Harmon seems to be the only ones who have it.
As for the air valve kit: In my own booster, both valves were just fine, but in the customer’s two boosters, three of the four air valves were broken. The one unbroken one (black) is shown in the above photo, along with two new (clear) air valves from Harmon. The kit also comes with a pair of springs for the air valves.
As promised (above) the next photo shows how I managed to remove and re-install the piston (Step 14) without use of the special tool:
 The job would be easier if you have a helper to hold the screwdriver, and the special tool would clearly be even easier, if you’re going to rebuild a lot of these things.
Here’s another view of the operation:
 I had to grind down the outside of the jaws of my circlip pliers so they could fit far enough down the hole.
A large C-clamp makes reassembly considerably easier:
 Of course, if you have a helper to hold things together , you can easily dispense with the C-clamp.
When you’re all finished rebuilding your late-model Girling booster, you should have the leftover parts as shown in the next photo:
 I have no idea why the kit includes the 3/8″ rubber seal, or the red rubber grease, but the 0.81″ (13/16″) rubber seal is used on early-model Girling boosters with the other type of air filter. See Reference 1.
Now we’re getting to the primary purpose of this post, specifically, how to repair a bad check valve:
 Shown in the above photo is the check valve from my 1965 Volvo 122S wagon, before I repaired it. The first photo in this post shows it after the repairs were made.
I was able (just barely) to insert the banjo end of the check valve into my 6″ Atlas lathe chuck, with the crimped (nipple) end sticking out:
 I cut the crimp off and pulled the nipple out. There was a rubber washer inside:
 The rubber washer (the smaller one, at the top of the photo) was clearly not going to ever seal again, so I replaced it with the larger one, shown at the bottom of the photo. That washer was removed from the white check valve that was salvaged from a mid-1980s Volvo 740. The 240s used the same type of check valve. The black one (at the bottom left) is a new one, which I did not take apart.
I used my Dremel tool to polish the valve seat inside the check valve:
 Then I reassembled the valve and applied a bit of Loctite 290 (green, penetrating grade) to the joint to ensure it was air-tight:
 Note the size of the inside of the nipple. This is considerably smaller than the inside diameter of the other type of check valve, to be shown later.
I made a collar, shown at the right of the next photo, from a piece of 7/8″ aluminum rod:
 Then I pressed the collar onto the check valve:
 I also applied a bit of Loctite 290 to the collar, just in case.
Next, I cut apart the check valve from my customer’s “1968” P1800. Much to my surprise, the internals were quite different:
 This one, I just thoroughly cleaned the inside, put it back together, then applied some Loctite:

I tested it, and it worked just fine. Next, I made myself another aluminum collar, pressed it on, and applied some more Loctite to the collar.
Notice that the ID of this nipple is considerably larger than the previous check valve (the one from my 1965 122S wagon. So, the inside diameter of the nipple is most probably a good indicator of which type of check valve you have.

Pingback: Early Girling Brake Booster Rebuild, 1964 Volvo P1800 | Tom Bryant, Wiscasset, Maine